Monday 31 October 2011

William Ashley Warehouse Sale

If you've never been to this event, it is a must.  This place is huuuge, brimming with everything you could ever want or need from housewares, candles, bedding, china, bath, baby, home decor, mirrors, frames, gadgets and Christmas stuff.  Your senses will go into overdrive with how much there is to see!  Mind the impatient and ill-mannnered shoppers though, there were surprisingly many of them. 

We were able to go to the sneak peak event this weekend for American Express card holders.  If you're considering going next year, I'd definitely recommend going during this early-bird weekend.  My mum has gone during the regular period in prior years and she said people were lined up for days!  Figuratively.  So consider yourself warned, it may be cramped!

I had been two years ago to buy some china for my sister's wedding, but I wasn't a home owner then so I didn't see the value that I did this time around.  Despite all the gorgeous things that I saw and wanted, and had in hand....and then put back on the shelf (I got the spenders-guilt gene from my mum), the only thing I ended up bringing home was a tiered drying rack for baking.  My mum, my sister and I started an annual Christmas baking tradition the year that my sister and I moved out, so these trays will definitely come in handy and save on space for our 3rd year!


It comes with 3 pieces


and they can be used separately or they can stack


I didn't even think to bring my camera, but I definitely should have since, as they say, a picture is worth a thousand words.  But check out their website, the warehouse is in Scarborough from November 2-27 2011, just about everything is marked down, with sometimes even up to 90% off!  Go now.  Don't wait.

Happy Halloween!! 

Psst....have any of you sanded and restained your staircase?  It's on my mind and i'm looking for any tips/advice!

Friday 28 October 2011

Spookified!

When it comes to Halloween decorations, I guess I'm a bit more traditional.  I like all the things that remind me of my childhood - things I would see while Trick-or-Treating or things we would decorate our own house with.  I don't go over the top (mainly because our first halloween we had 2 children come to our house.  Then last year we had I think 12 kids) So it's a lot of effort to go to, when so few kids are around to enjoy it.  But I'm hoping that we'll get more kiddies each year and then I'll add to the decorations accordingly. 

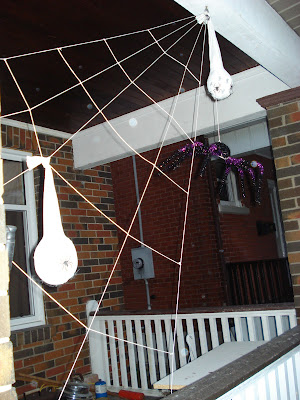
I like cobwebs.  But last year I got so sick of the usual dollar store ones.  The kind you stretch out really thin and stick to the bricks on your house.  They were constantly blowing off the house and, is it just me, or are they making them with worse and worse quality?  Last year they wouldn't even stretch out without breaking apart in chunks.  Very frustrating.  So this year I spotted an idea in the Martha Stewart Halloween magazine that I thought I'd try out... 

I can't seem to find the picture of the porch that inspired me, but it's in her 2011 Halloween magazine if you're curious...


The tree in the above picture is the reason why I can't get a straight-on picture of my house.  The tree is dead centered on the house and goes all the way up to the second floor.  It's nice for privacy, but not so much for picture taking.

I think I'm going to stick to this web from now on!  It makes for much easier clean up and I like that it's reuseable, so that I won't have to spend money on new cobwebs every year.  And then I just may add some more of these webs for different parts of the porch as the years go on. 
Last year my sister and I took on a spider sac craft from Martha (See Martha's version here).  Using dollar store white tights, we stuffed them with cobwebs and baby spiders and glue gunned bigger spiders on the outside.


(woops!  Forgot to declutter the porch for the pic!)


A friend of mine bought me this awesome spider that is the perfect size for my new web, and it has little purple lights that flash when you turn it on for the big night!


 Inside the house I have my doily webs decking out my windows...


I had this orange vase and these black feathers so I put them together for a traditional Halloween colour scheme.  Then I saw both Sherry at YHL and Kerry at First Time Fancy do a little decorating with things they already had at home....books!  I have a bookshelf here and so I thought maybe I could try my own combo out...


I chose books based on their colour, I wanted to keep the black and orange going, and I tried to find ones that also had a spooky-ish title.  "The Art of Zombie Warfare", makes sense...."Where's Mom Now That I Need Her?"...well, it was orange....and if there was ever a zombie warfare, I'd definitely want my mum around.  And "Almost", it was black.  And maybe we only "Almost" survived the zombie warfare??  Ok maybe I'm reaching...but I like it!

I had to throw the cheesy pumpkin candle holder in there and a little white candle to go with the white book.  I enjoy! 

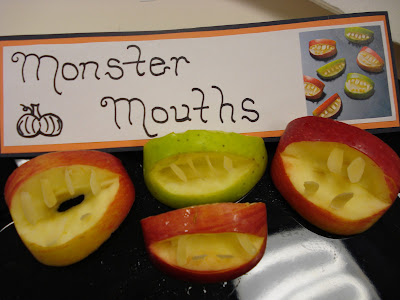
I didn't make these this year, but here's some fun Halloween treats I've made before


Apple slices and almond teeth


Hot dogs wrapped in tortillas with bloody ketchup nails (which I would never eat because I think ketchup is disgusting, but if you don't, give them a whirl!)


Carrots with almond nails in spinach dip


So there you go, just a little Halloween decor around here...I've already got a few things I want to make next year to add to it all!

***update, we had 32 trick-or-treaters this year, more than double than last year!
Are you into decorating for Halloween?  Do you like to make your own decor?  Any fun treats you make?

Thursday 27 October 2011

Versatile Blogger Award

Meg over at Nutmeg and Company awarded me with the Versatile Blogger Award, thanks Meg!  I love reading Meg's blog, she and her husband and 2 kiddos have recently moved and have lots of plans to renovate and decorate!


To accept this award you must thank the person you awarded it to you and include a link to their blog.  Then choose 15 fellow bloggers that you've recently discovered or follow regularly to pass the award along to and share 7 things about yourself.

So here's the 7 things you may not know about me...

1.  When I was younger I used to do Irish dancing (no I'm not in the picture lol) and have since dabbled in Belly Dance, Bollywood and Contemporary dance.  I am by no means a dancer, I just like to pretend to be!


2.  I love to be barefoot and insist on wearing my flipflops well into the cold weather....as long as there's no snow!

3.  I spent a year living in Korea teaching english


4.  Although I think it smells great, I've never tried coffee


5.  I had surgery on my jaw when I was 16 and was wired shut for 6 weeks (I'll spare you pictures of that!)

6.  I've been bad lately, but normally I do non-competitive boxing - best exercize ever


7.  And, most exciting to me.....I'm going to be an aunt in less than 5 months!!!!!!!!!!!!!!


I'm passing this award on to these lovely bloggers:

Amelia at House Pretty (up)

Britt at My Daily Randomness

Cindy at The Flipping Couple

Heather at Interior Groupie

Holly at Life in the Fun Lane

Janice at Life Begins At Thirty, Right?

Jen at Rambling Renovators

Jessica at Decor Adventures

Kasey at Thrifty Little Blog

Katrina at Chic Little House

Kerry at First Time Fancy

Lisa at Winter Pays for Summer

Maggie and Rob at Okay, Now What?

Nette at This Dusty House

Shannon at 8 Foot 6


Wednesday 26 October 2011

Living/Dining To-Do

Although the living and dining area is now pretty much done, we still have those few finishing touches to do.  And in all honesty, might take a while to get around to them all.

Here's what's still got to be done and I'll check it off as they are done:

* Install plugs in the outlets (they're already wired, just need the plugs put in)
* Install pot lights (again, already wired, just need to pop the hardware in)
* Strip/sand old baseboards
* Repaint old baseboards
* Install baseboards
* Replicate/recreate remaining trim (some of the original baseboards had been replaced by new, much shorter ones by the previous owners)
* Pray that the old window trim will fit our new windows
* If they do, strip, sand, repaint and install them
* If they don't....cross that bridge when we get to it.

Here are a few pics of the work that still has to be done


This is how the windows look now with no trim, foam exposed and messy drywall ends.


Walls with no baseboards yet


Pots lights are just hanging there...we just need to attach them (oooo a little sneak peek of some paint I did last week!)


Outlets with nothing but wires


This is just our bare minimum To-Do list, once this is done, then I'll be able to get to the more fun To-Do list with things like art, shelves, mirrors, rugs....can't wait!

PS....can you guess what arrived in the mail on Monday!?


Looks like I'll be rolling up my sleeves this weekend!!

What's on your To-Do list?

Tuesday 25 October 2011

Sticker Shock

While I'm waiting for my fabric to be delievered for my benches I'm gathering the other supplies I'll be needing.  Since this is my first attempt at upholstery I don't have anything on hand.  I called fabricland last week to see about their pricing for high density foam, only to be told that Fabriclands don't sell it.  Ummmm, where else am I supposed to get it! 

Luckily the lady recommended an independent place right around the corner from me, Ace Upholstery, who might.  I was happy to find that they did sell the foam, so I bought two 21x23 pieces for $20 each.  I was a little surprised that foam would cost so much.  The salesman said it was because the foam was made from oil.  Out of curiousity I called another Fabricland location and found out they do sell high density foam.  My heart dropped  a little before I asked how much they charged, in fear that I had been had at this other store.  I was pleasantly relieved to find that Fabricland's prices were more expensive.  Phew!


Since this is my first attempt, I checked a couple online tutorials and bought 3" high density foam thinking that was standard for furniture that would be sat on, but in hind sight I should have taken into account how high the tables already are.  I should have got maybe 2" foam.  But, the 3" will have to do now!  If I find they are too high I can always cut the legs down a bit.

Last week I went to Fabricland to see about some batting.  The lady looked at me like I had two heads when I told her what it was for.  Are they behind the times or something, or is it me, am I missing something?  Why is Fabricland against my little project!  So for just over 2 yards it would be $18.99.  I thought maybe this new place I found the foam from might beat that price.  I just got off the phone with them and they charge $3.99/yard!  Which would mean that 2 yards would be $8 + tax.  More than half the price! 

Moral of the story....shop around.  Turns out independent stores aren't always more expensive as I had expected!

Where do you go for your upholserting needs (fabric, foam, batting...)?

Monday 24 October 2011

DIY Wrapping Paper

On Friday my sister and I headed to our cousin's house for her eldest's 7th birthday celebration.  After I bought her gift I realized that I had nothing but Christmas wrapping paper and gift bags that were two sizes too small.  I decided to fashion my own wrapping instead of heading back out the the store.

I used some ancient craft paper that my sister and I have had since we were probably 10


I grabbed one of my Martha Stewart punchers and punched a bunch of flowers out


I drew out a letter F for the name tag and cut out a tag-like shape, then glued them together and tied some string on.


Next I wrapped her gift and glued everything on


This was for an awesome seven year old who loves zombies and Greek mythology.  She is truly one of a kind and I knew she would appreciate this black and hot pink wrapping paper.

I think I just may make my own wrapping paper again sometime!

Do you ever make your own wrapping paper?  Any favourite materials or designs?  Any tips??

Friday 21 October 2011

Hello Pretty Floors!

I cannot describe how wonderful it is to walk on clean floors.  Yes, that is a luxury in this house.  Our old floors were gummy and dirty no matter how much I cleaned them and would discolour your feet!  Now our floors are smooth, gum-less, and I can walk around barefoot again, woot!  Putting in new subfloors involved picking up about 12 sheets of OSB (Oriented Strand Board) and screwing it to the old subfloor.  We staggered the way we layed each sheet to make for a stronger floor.  We went from the old subfloor...


To the new subfloor...


We had shopped around for flooring and sales for a while and finally came across some floating bamboo floors that were $1.99/sq ft on clearance.  And with a couple Home Depot Gift Certificates we could put towards it, that was a deal we were pretty happy with!  We really wanted to get bamboo for their sustainability.  We also had to buy the foam padding that they suggest you put under a floating floor. 

When it came to choosing the stain, we knew we didn't want a stain that would be too trendy (ex. something on either end of the dark/light scale).  Even though we love the look of really dark floors, and also saw some neat "ghost" bamboo floors, we opted for something a little more traditional.  It fit with the house more and we hope that they will have more longevity. 

Laying the first row of boards was the most important and time consuming.  It was essential to measure and measure again, to make sure everything was level and straight.  It was also the most time consuming because there were a few cut-outs to make.


After the first row was put down, installation was super easy.  The only cuts that had to be made were the excess pieces on either end of the row, and also around the heating vents.  I like to think we work well as a team - so our strategy was for me lay out a row, making sure each piece was staggered in an aesthetically pleasing way, and Darryl would follow behind me, clicking/ramming them into place. 

So for the weekend, I'll leave you with our new floors...


I'm going to keep it real with you, that's what the floors still look like, with that same pile of leftover bamboo in that same exact spot.  We've since moved onto other projects and have somehow neglected to put the excess away....we'll get to it....

Enjoy your weekend - any exciting plans?!

Thursday 20 October 2011

Ever Wonder What's Under Your Floors?

So the floor demo began and this was all on Darryl.  I stayed upstairs and pretended it wasn't happening.  The good thing is that we saved a whole bunch of the wood in case we need to replace anything upstairs.  Here he is preparing for the job...


He started demo later in the day, so he completed it over the course of two days.  He used a crowbar to pull the boards up.  Under the wood was a layer of wax paper.  After getting one half of the room pulled up, he had to go back and pull out the gazillions of little nails that didn't come out with the wood.


Before taking the paper layer up, he swept up.  Look what was under the floors...


How does that much dirt get under there??  Shocking.  Finally, he pulled up the paper stuff and we were left with the subfloor exposed.


You can see in the left side of the picture, that triangle hole, where the subfloor had cracked and fallen into the basement.  So we were definitely in need of some new subfloors - which I'll share with you tomorrow!

Have you taken up any floors?  Did you find anything underneath them?

Wednesday 19 October 2011

To Replace or Not to Replace...

This was an ongoing question for many months.  Initially our intention was to sand and restain the floors to bring them back to life.  Who in their right mind would get rid of original, decent hardwood right?  The floors in the living/L-shaped dining room  were alright.  Sure they'd been scuffed up, scratched, dulled and a little warped, but no biggie right?


 Well once we were in full on demo mode, where walls were all down, the full bathroom was removed, we could see what the floors underneath were like.  Or rather, that there weren't any floors there at all...


The above is a picture of where the opening between the living and dining room once was.  You may remember seeing it like this during demo (the part furthest to the right is where a wall once stood and once we ripped the frame out, we were left with what you see in the above picture)


The door in the above picture was not an original fixture, it was once a solid wall.  The door was put in to convert the dining room into a bedroom.  When they opened that part of the wall up, they were obviously left with a gap in the floor like we were.  However unlike us, they decided to patch it in a really shabby way...


And then once we took the tub and flooring out of the bathroom, we saw that the previous owners thought it would be a good idea to cut all of the floor out in order to put icky vinyl flooring in instead.


Then there were a few other random holes like this one, where an old heating register/vent thing was in the middle of the house which = inefficient heating. 


And it's a little hard to see in that picture, but the kitchen side of the house and the living/dining side were two different heights.  We knew that if we put in new flooring we'd have to put a new subfloor in, which would raise the floor to be almost flush with the kitchen side.  So many factors to consider and in the end we decided to put new flooring in.  Not everyone's choice I know, and one that I struggled with, they hold so much history.  But the scale of the project was beyond what I think we could do.  The floors upstairs are better and I hope we can refinish them.
Pop back tomorrow to see the beginnings of the floor changes!

Have you had to replace old floors?  Did it break your heart too??  Or were you able to refinish your old ones (if so any tips/advice is appreciated as we hope to tackle that in the future)?